Installation of a swing gate motor
Today let’s see together how to motorise a swing gate, step by step, and how to program the control unit. The automation model examined is OP2, one of our most popular models.
Installing a LIFE Home Integration swing gate motor is really easy and intuitive.
The operations to program an Optimo motor are:
- Programming of the control unit: with a simple click it is possible to program the control unit immediately obtaining the cycles and the phase lag of the leaves;
- Programming the remote control: which allows you to manage the radio control (learning the radio control, deleting a programmed radio control or all of them);
- Force setting: the force adjusts the thrust during the movement;
- Sensitivity setting: the automation is equipped with an adjustable obstacle detection system, so that the automation reverses its movement when it impacts against an obstacle during the opening or closing phase;
- Options menu: it allows to activate specific functions aimed at improving the functionality of the gate.
The control unit for 24V automatic swing gates
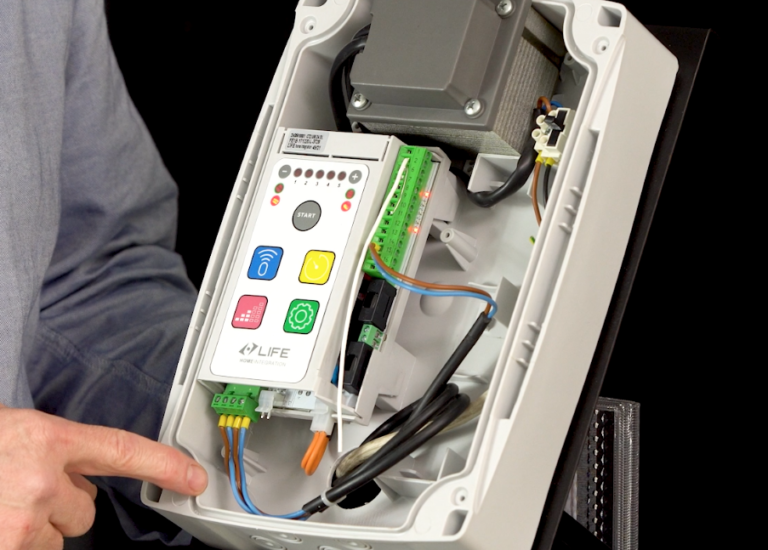
The control unit that we have developed is GEUNI24R DL2 which is specifically designed for 24V automations and can work with one or two motors.
The interface of this gate control unit is highly intuitive and it’s the same in all Life Home Integration automation, a universal system designed to facilitate the work of installers.
The start button
There is the central START button which is used for programming and also to RESET, or as a STEP-BY-STEP command once the initial setup is completed.
The blue button
It is used for programming the remote control, but also for deleting if necessary.
The yellow button
It is used to adjust the automatic closing time and slowdown phases.
The red button
It is used to adjust the motor force and sensitivity.
The green button
It is used to adjust several options that may be required by the user and are important to achieve complete satisfaction of the end customer.
Preliminary operations for installing the swing gate motor
When we decide to install a swing gate automation, we must place the leaves at 45° and lock them; we recommend not installing other devices before programming.
How to program the control unit
Keep in mind that the first maneuver to be carried out must always be closing.
- Check the closed contacts under the terminal block (the LEDs must be lit with a steady red light).
- Press the START button for 5 seconds and, once the LEDs light up, release and briefly press the START button again. In this way the leaves will activate autonomously, it is essential that the first operation must always be a closing cycle, then the machine will carry out an opening maneuver to search for the mechanical stop, and then a final closing maneuver with the slowdowns already activated, a special software feature prevents the doors from overlapping.
- Successful programming is confirmed by the two green LEDs flashing at the top of the control unit, while the red LEDs signal the activated limit switches.
- Now the START button can be used as a STEP-BY-STEP command to carry out functional and safety checks.
How to adjust the automatic closing
In order to set the automatic closing, press the yellow button and release, now use the + and – keys to adjust the time options. Once done, press the yellow button again to confirm and quit. Once adjusted this option the gate will open and then automatically close after 5″ – 10″ – 30″ – 60″ – 120″.
How to program the gate remote control from the control unit
Press and release the blue button, the first red LED in the row is activated. Now press the remote-control button that you want to pair, all the red LEDs (1-2-3-4-5) will light up briefly. Press the blue button twice to save the operation and quit.
How to set the force and sensitivity
Press the red button to enter the force menu, use the + and – buttons to increase or decrease its value. Press the red button again to confirm and quit. Hold down the red button for 5 seconds to enter the sensitivity menu. Adjust with + and – buttons. Press again the red button to confirm and quit.
Setup additional options
With the green button, it’s possible to adjust further options to meet specific requirements of the installer or of the user. Press the green button once, then keep pressing it to scroll through the available options. Each option is shown by a LED dot from 1 to 5. In order to activate the option, press the + button. To deactivate it once enabled, press the – button. To quit the menu, press the green button until all dots between 1 and 5 are off.
LIFE Home Integration allows you to simplify the installation process: thanks to the universal programming system, you can easily and quickly install LIFE automation in just a few steps.
This allows you to save precious time.


